Brother SE-400 User Manual: A Comprehensive Guide
This manual provides detailed instructions for the Brother SE-400 combination sewing and embroidery machine, sourced from official Brother support resources as of March 30, 2026․
The Brother SE-400 is a popular computerised sewing and embroidery machine, designed for both beginners and experienced crafters․ It seamlessly blends sewing functionality with the creative possibilities of machine embroidery, offering a versatile solution for a wide range of projects․ This machine, supported by Brother’s extensive online resources (as of March 30, 2026, via support․brother․com), allows users to create custom designs, personalise garments, and explore diverse crafting techniques․
Its user-friendly interface and built-in features make it an excellent choice for those looking to expand their creative horizons․ This manual will guide you through every aspect of the SE-400, from initial setup to advanced techniques․

Unboxing and Initial Setup
Upon receiving your Brother SE-400, carefully inspect the box for any damage during shipping․ Once opened, verify that all included accessories are present, referencing the ‘Accessories Included’ section of this manual․ Before powering on, remove all packing materials and protective tape from the machine․ Connect the power cord and ensure the power switch is in the ‘off’ position․
Initial setup involves attaching the embroidery hoop, threading the machine (detailed later), and winding a bobbin․ Refer to Brother’s support website (support․brother․com, accessed March 30, 2026) for visual aids and troubleshooting․
Machine Overview: Key Components
The Brother SE-400 is a versatile machine combining sewing and embroidery functionalities․ Key components include the control panel with its LCD display for stitch and design selection, the needle and presser foot mechanisms responsible for fabric manipulation, and the bobbin winding/threading system crucial for stitch formation․ The embroidery unit features a detachable hoop and arm for design creation․
Understanding these components, as detailed in the official Brother manuals (support․brother․com, accessed March 30, 2026), is fundamental for efficient operation and maintenance․ Familiarize yourself with their locations and functions before proceeding․
Control Panel and Display
The Brother SE-400’s control panel, as outlined in the official Brother support documentation (support․brother․com, accessed March 30, 2026), features an LCD touchscreen․ This display allows users to navigate menus, select stitches, edit embroidery designs, and adjust machine settings․ Dedicated buttons provide quick access to essential functions like needle up/down, thread trimming, and start/stop․
The display also shows stitch parameters, bobbin thread supply, and error messages․ Mastering the control panel’s interface is vital for utilizing the machine’s full capabilities and customizing projects․
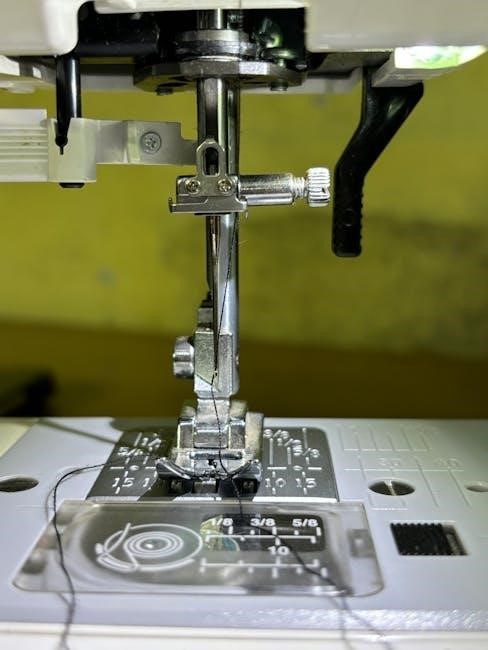
Needle and Presser Foot Mechanisms
The Brother SE-400 employs a sophisticated needle and presser foot system, crucial for both sewing and embroidery, as detailed in the official Brother manuals (support․brother․com, accessed March 30, 2026)․ The machine utilizes a vertical needle drop, enhancing visibility and precision․ The presser foot pressure is adjustable, accommodating various fabric thicknesses․
Different presser feet are available for specialized tasks like zipper insertion, buttonholes, and embroidery․ Understanding how these mechanisms interact ensures optimal stitch quality and prevents fabric damage during operation․
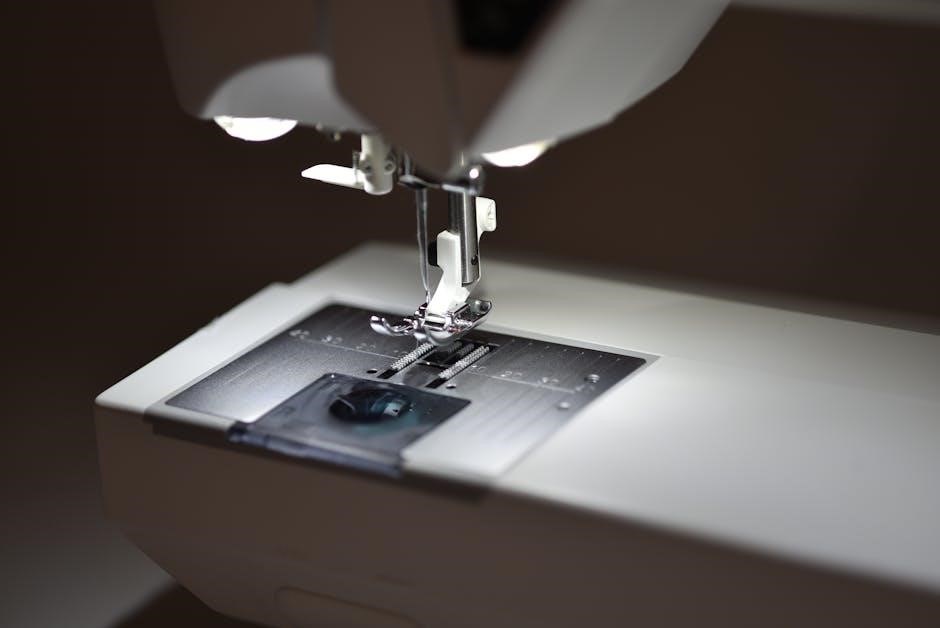
Bobbin Winding and Threading
Proper bobbin winding and threading are fundamental to the Brother SE-400’s operation, as outlined in the official Brother support documentation (support․brother․com, accessed March 30, 2026)․ The machine features a convenient, top-loading drop-in bobbin system․ Winding is accomplished via a dedicated bobbin winder, ensuring even distribution of thread onto the bobbin․
Correct threading of both the upper and lower threads is vital for balanced stitches․ The SE-400 includes a clear, numbered threading path to guide users, minimizing errors and ensuring smooth operation․
Basic Operation: Getting Started
Embarking on your creative journey with the Brother SE-400 begins with understanding its core functionalities, as detailed in the official user resources (support․brother․com, accessed March 30, 2026)․ This section covers the essential steps to initiate sewing and embroidery projects․ Familiarize yourself with powering the machine on/off and navigating the control panel․

Successfully completing these initial steps—threading, bobbin insertion, and stitch selection—forms the foundation for all subsequent operations․ Practice these basics to build confidence and achieve optimal results․
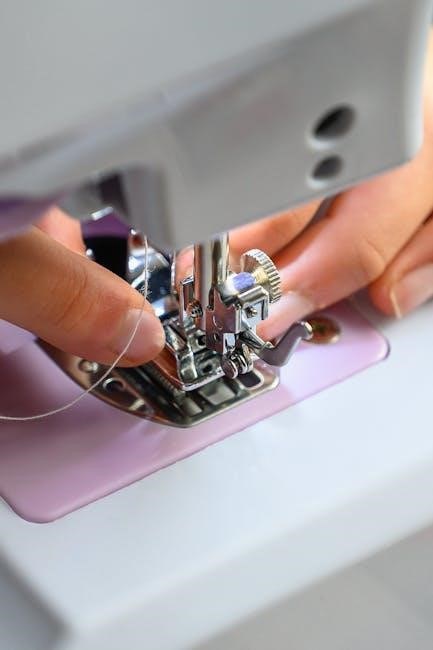
Threading the Machine
Correct threading is crucial for optimal stitch formation on your Brother SE-400, as outlined in the official manual (support․brother․com, accessed March 30, 2026)․ Begin by raising the presser foot and thread stand․ Follow the numbered threading path indicated on the machine, guiding the thread through each guide and tension disc․
Ensure the thread is securely seated in the take-up lever and finally through the needle․ Proper threading prevents skipped stitches and ensures smooth operation․ Refer to the diagram in your manual for visual guidance during this process․
Winding and Inserting the Bobbin
The Brother SE-400 utilizes a convenient bobbin winding system, detailed in the official Brother support documentation (support․brother․com, accessed March 30, 2026)․ Place the thread spool on the spool pin and follow the bobbin winding path, ensuring the thread engages the tension disc․ Wind several layers of thread onto the bobbin evenly․
Once wound, insert the bobbin into the bobbin case, ensuring it clicks into place․ Guide the thread through the tension spring before bringing it up through the needle plate opening for sewing or embroidery․
Selecting Stitches
The Brother SE-400 offers a diverse range of built-in stitches, accessible via the machine’s control panel (refer to Brother support resources, accessed March 30, 2026)․ Use the stitch selection buttons to browse through available options, categorized for sewing and embroidery․ The LCD screen displays a preview of each selected stitch․
For embroidery, choose from pre-programmed designs or import custom patterns․ For sewing, select the desired stitch type, length, and width using the corresponding controls, tailoring the stitch to your fabric and project needs․
Embroidery Features: A Deep Dive
The Brother SE-400 truly shines with its embroidery capabilities, offering a seamless experience from design import to finished product (based on information from Brother support, accessed March 30, 2026)․ This section explores the machine’s embroidery functions in detail․ Users can import designs via USB, editing them directly on the machine’s LCD screen for customization․
Explore hoop options for various embroidery sizes and attach them securely․ The machine supports multiple file formats, ensuring compatibility with a wide range of embroidery designs available online․
Embroidery Hoop Selection and Attachment
The Brother SE-400 includes several embroidery hoops to accommodate different project sizes (information sourced from Brother support on March 30, 2026)․ Selecting the correct hoop is crucial for achieving optimal embroidery results․ Smaller hoops are ideal for intricate designs or detailed lettering, while larger hoops suit broader patterns․
Attaching the hoop involves aligning it with the machine’s embroidery arm and securing it with the provided screws․ Ensure the fabric is taut within the hoop, but not stretched, for best results․ Proper hoop attachment prevents design distortion during stitching․
Importing Embroidery Designs
The Brother SE-400 supports importing embroidery designs via USB memory stick (as per Brother’s support documentation, March 30, 2026)․ Compatible file formats include PES, DST, and others, allowing flexibility in design sourcing․ Save your desired embroidery file to the USB drive, ensuring it’s properly formatted․
Insert the USB drive into the machine’s designated port․ Navigate to the import function on the control panel, and select the file․ The machine will then load the design, ready for editing or stitching․ Always verify the design’s integrity after import․
Editing Designs on the Machine
The Brother SE-400 offers built-in editing capabilities for imported or pre-loaded embroidery designs (based on Brother support information, March 30, 2026)․ Users can resize, rotate, and mirror designs directly on the machine’s LCD screen․ Basic color changes are also possible, allowing for customization․
The editing suite includes functions for adjusting stitch density and trimming unwanted elements․ Utilize the intuitive on-screen controls to fine-tune your designs before embroidery․ Saving edited designs is crucial to preserve modifications for future use, ensuring personalized creations․
Advanced Embroidery Techniques
Mastering advanced techniques unlocks the full potential of your Brother SE-400 (as of March 30, 2026, per Brother support)․ Explore utilizing various embroidery thread types – rayon, polyester, and cotton – each offering unique textures and sheen․ Proper stabilizer selection is vital; cut-away, tear-away, and wash-away stabilizers suit different fabrics․
For larger designs, multi-hoop embroidery allows seamless continuation across multiple hoops․ Experiment with layering designs and utilizing specialty embroidery feet for textured effects․ Understanding these techniques elevates your embroidery projects significantly․
Using Different Embroidery Threads
The Brother SE-400 (information current as of March 30, 2026, via Brother support) supports a variety of embroidery threads, each impacting your project’s final look․ Rayon offers a brilliant sheen, ideal for vibrant designs, but is less durable․ Polyester is stronger and colorfast, perfect for items needing frequent washing․ Cotton provides a matte finish and softer texture․
Experiment with thread weights; thicker threads create bolder designs, while finer threads offer intricate detail․ Always test thread compatibility with your chosen fabric and stabilizer to prevent issues․
Stabilizers and Fabrics for Embroidery
Selecting the correct stabilizer is crucial for successful embroidery on the Brother SE-400 (as of March 30, 2026, per Brother’s support documentation)․ Lightweight knits require a cut-away stabilizer, providing support during stitching․ Woven fabrics often benefit from tear-away stabilizers, easily removed post-embroidery․ For delicate fabrics, use a wash-away stabilizer that dissolves in water․
Fabric choice impacts design quality; tightly woven fabrics are easier to embroider than loosely woven ones․ Always test a sample to ensure proper stabilization and prevent puckering or distortion․
Multi-Hoop Embroidery
The Brother SE-400 (information current as of March 30, 2026, according to Brother support) supports multi-hoop embroidery, allowing for larger designs or multiple smaller designs to be created simultaneously․ This feature significantly increases production efficiency․ Ensure designs are properly aligned within the software before transferring to the machine․
Carefully consider thread colors and changes when utilizing multiple hoops․ The machine will prompt for color changes as needed․ Proper planning minimizes interruptions and ensures a seamless embroidery process, maximizing the machine’s capabilities․
Sewing Features: Beyond Embroidery
The Brother SE-400, as of March 30, 2026 (based on Brother support documentation), excels beyond embroidery with a robust set of sewing capabilities․ It features a variety of built-in stitches suitable for diverse projects, from garment construction to quilting and home décor․ Users can easily select stitches via the intuitive control panel․
Adjustable stitch length and width provide customization for different fabric types and desired effects․ Explore optional presser feet to expand the machine’s sewing versatility, tackling specialized techniques with ease and precision․
Built-in Sewing Stitches
As detailed in the Brother SE-400 documentation (current as of March 30, 2026), this machine boasts an impressive array of 60 built-in sewing stitches․ These encompass essential straight stitches, zigzags, decorative options, and buttonhole functions․ The stitch selection caters to a wide range of sewing projects, from basic repairs to complex garment construction․
Stitch patterns include utility stitches for durable seams, stretch stitches for knit fabrics, and ornamental stitches for embellishment․ The machine’s LCD screen clearly displays each stitch, aiding in precise selection and project planning․
Adjusting Stitch Length and Width
The Brother SE-400, as of March 30, 2026, allows for precise control over stitch length and width via dedicated buttons on the control panel․ Stitch length adjustments range from 0․0mm to 4․0mm, influencing the density and strength of the seam․ Width adjustments, applicable to zigzag and decorative stitches, extend up to 7․0mm, enabling varied design effects․
These settings are crucial for adapting to different fabric types and achieving desired aesthetic outcomes․ Experimentation is encouraged to determine optimal values for each project, ensuring both functionality and visual appeal;
Using Optional Presser Feet
The Brother SE-400, current as of March 30, 2026, benefits greatly from its compatibility with a range of optional presser feet․ These accessories, available separately, expand the machine’s capabilities beyond standard sewing․ Examples include a zipper foot for precise zipper insertion, a buttonhole foot for consistent buttonholes, and a quilting foot for even stitch distribution․
Proper foot attachment is essential for optimal performance; consult the machine’s manual for detailed instructions․ Utilizing the correct foot significantly enhances sewing accuracy and project quality․
Maintenance and Troubleshooting
Regular maintenance, as of March 30, 2026, is crucial for the Brother SE-400’s longevity and performance․ This includes routine cleaning to remove lint and debris from the bobbin area and feed dogs․ Proper lubrication of oil points, detailed in the manual, ensures smooth operation․
Troubleshooting common issues like thread breakage or skipped stitches often involves re-threading the machine or checking the needle and bobbin․ Refer to the Brother support website (https://support․brother․com/g/b/manualtop․aspx?c=us) for error code explanations and solutions․
Cleaning the Machine
Maintaining a clean Brother SE-400, as of March 30, 2026, is vital for optimal performance․ Regularly remove lint buildup from the bobbin case, rotary hook, and feed dog area using the provided brush․ A soft cloth dampened with water can clean exterior surfaces․
Avoid using abrasive cleaners or solvents․ The needle plate should be brushed frequently․ Consult the official Brother support resources (https://support․brother․com/g/b/manualtop․aspx?c=us) for detailed cleaning diagrams and recommended schedules to prevent malfunctions and ensure smooth operation․
Oil Points and Lubrication
The Brother SE-400, as of March 30, 2026, requires minimal oiling for consistent performance․ Refer to the official Brother support documentation (https://support․brother․com/g/b/manualtop․aspx?c=us) to identify specific oiling points․ Typically, these include the rotary hook area and potentially the needle bar mechanism․
Use only sewing machine oil; avoid general-purpose oils․ Over-oiling can attract lint and cause issues․ Apply oil sparingly and wipe away any excess․ Regular cleaning, as detailed in the manual, often reduces the need for frequent lubrication, ensuring longevity․
Common Error Messages and Solutions
The Brother SE-400, according to Brother support resources updated March 30, 2026 (https://support․brother․com/g/b/manualtop․aspx?c=us), displays error codes to indicate issues․ “Thread Break” often means re-threading is needed․ “Bobbin Thread” errors suggest incorrect bobbin insertion or tension․ “Needle Break” indicates a bent or improperly installed needle․
Consult the full user manual for a complete list and detailed troubleshooting steps․ Restarting the machine and checking all connections are initial steps․ If problems persist, contact Brother support for assistance, referencing the specific error code․
Safety Precautions
Operating the Brother SE-400 requires adherence to safety guidelines, as detailed in the official manual (Brother Support, March 30, 2026 ⏤ https://support․brother․com/g/b/manualtop․aspx?c=us)․ Always disconnect the power before changing needles, threading, or performing maintenance․ Keep fingers away from moving parts like the needle and presser foot during operation․
Never use damaged power cords․ Ensure proper ventilation to prevent overheating․ Supervise children when near the machine․ Do not attempt repairs beyond those described in the manual; contact authorized service personnel for complex issues․
Accessories Included
The Brother SE-400 package, as of March 30, 2026 (referencing Brother Support: https://support․brother․com/g/b/manualtop․aspx?c=us), includes several essential accessories․ These comprise multiple embroidery hoops in varying sizes for diverse design applications․ A set of standard presser feet caters to different sewing tasks, enhancing versatility․
Additional inclusions are needle sets, bobbins, a seam ripper, cleaning brush, and screwdriver․ An embroidery floss guide and spool caps are also provided․ The quick reference guide assists with initial setup and operation, ensuring a smooth user experience right out of the box․
Where to Find Additional Resources
For comprehensive support beyond this manual, the official Brother Support website (https://support․brother․com/g/b/manualtop․aspx?c=us, accessed March 30, 2026) offers downloadable manuals, FAQs, and troubleshooting guides․ This platform provides direct access to the latest updates and solutions for your SE-400․
Furthermore, numerous online forums and communities dedicated to Brother embroidery machines exist․ These platforms allow users to share tips, ask questions, and exchange experiences, fostering a collaborative learning environment․ Engaging with these communities can unlock valuable insights and problem-solving assistance․
Brother Support Website
The official Brother Support website (https://support․brother․com/g/b/manualtop․aspx?c=us) serves as a primary resource for SE-400 owners․ Here, you’ll find downloadable user manuals in various formats, offering detailed guidance on all machine functions․ A comprehensive FAQ section addresses common queries, while troubleshooting tools assist in resolving operational issues․
Regularly check this site for firmware updates, which can enhance machine performance and add new features․ Brother also provides helpful videos and tutorials demonstrating key techniques, ensuring you maximize your SE-400’s capabilities․ Access was confirmed on March 30, 2026․
Online Forums and Communities
Numerous online forums and communities dedicated to Brother embroidery machines, including the SE-400, offer valuable peer-to-peer support․ These platforms allow users to share tips, troubleshoot problems, and showcase their creations․ Engaging with experienced SE-400 owners can provide practical advice and innovative techniques not found in the official manual․
Popular forums often host design exchanges and tutorials, expanding your creative possibilities․ Remember to verify information shared within these communities, as advice can vary․ Active participation can greatly enhance your SE-400 experience, as of March 30, 2026․
Frequently Asked Questions (FAQ)
Many common questions arise when using the Brother SE-400․ Users frequently inquire about thread types, stabilizer selection, and design compatibility․ Troubleshooting issues like skipped stitches or embroidery errors are also common concerns․ The official Brother support website (as of March 30, 2026) provides a comprehensive FAQ section addressing these topics․
Additionally, online forums often compile lists of frequently asked questions and their solutions, offering a broader range of user-generated answers․ Regularly checking these resources can save time and frustration when encountering operational challenges․